VirtualHere is introducing a new product called the VirtualHere CloudHub. This is a complete USB sharing solution, including the Optimized VirtualHere USB Server, a Management Interface and an Embedded Operating System all in a single easy to use firmware image that can be flashed to cheap and generally available routers and embedded devices.
These instructions below will install the Free Version of VirtualHere CloudHub on your hardware device. To enable all features of the registered VirtualHere server please purchase a license
Firmware Image version 4.8.7 (Changes)
To Install: (![]() FAQ)
FAQ)
1. Make sure you have one of the following devices (or purchase one from Amazon/eBay/Electronics Shop etc.):
- Raspberry Pi 0 W
- Raspberry Pi 02 W
- Raspberry Pi 3 Model B
- Raspberry Pi 4 Model B
- Raspberry Pi 5
- GL-AR300M16
2. Write the firmware
CHOOSE THIS SECTION OF YOU HAVE A RASPBERRY PI
Are you upgrading from a previous edition of CloudHub?
NO I dont have CloudHub on my Pi yet - Download Win32 Disk Imager and install. Then download this img file and use Win32DiskImager or Pi Imager to write it to an SD card. Put the sd card into your Raspberry Pi and plug in the power.
Raspberry Pi 0 W cloudhub-pi0w-initial.img
Raspberry Pi 02 W cloudhub-pi02w-initial.img
Raspberry Pi 3 Model B cloudhub-pi3-initial.img
Raspberry Pi 4 Model B cloudhub-pi4-initial.img
Raspberry Pi 5 cloudhub-pi5-initial.img
Now continue at step 3. below.
YES I am already running Cloudhub version 4.6.4 or newer on my Pi. - Since you are already running the VirtualHere CloudHub, bring up the Administration Interface by right clicking CloudHub_xxxx in the VirtualHere Client, select Properties -> Configure -> Enter Admin password->Advanced Button->Upgrade Firmware (The current settings will be remembered after the upgrade) and upload the file below:
Raspberry Pi 0 W cloudhub-pi0w-upgrade.bin
Raspberry Pi 02 W cloudhub-pi02w-upgrade.bin
Raspberry Pi 3 Model B cloudhub-pi3-upgrade.bin
Raspberry Pi 4 Model B cloudhub-pi4-upgrade.bin
Raspberry Pi 5 Model B cloudhub-pi5-upgrade.bin
Once that firmware is uploaded the pi will reboot and the new version will be installed
NO i am running CloudHub version 4.6.3 or older on my pi. You will need to physically re-write the initial image above. Over the air updates are not supported prior to version 4.6.4
CHOOSE THIS SECTION IF YOU HAVE A GL-AR300M16
Are you running the stock firmware?
YES - Install the firmware Upgrade image (below) on the router by flashing it with the built-in router configuration interface "System -> Advanced Settings -> Luci -> System -> Backup/Flash Firmware -> Flash new Firmware Image button -> Check Force Upgrade AND UNcheck Keep Settings -> OK
NO - Since you are already running the VirtualHere CloudHub, bring up the Administration Interface by right clicking CloudHub_xxxx in the VirtualHere Client, select Properties -> Configure -> Enter Admin password->Advanced Button->Upgrade Firmware (The current settings will be remembered after the upgrade) :
GL-AR300M16 (Upgrade Image) cloudhub-gl-ar300m16-upgrade.bin
Now continue at step 3. below.
3. Make sure no Ethernet cables are plugged into the CloudHub device and then turn it on
4. The device will reboot and a WiFi network called CloudHub_xxxxxx (where xxxxxx is a unique number) will appear
5. Join the network with your WiFi card on your client PC. (Default WiFi password is: cloudhub66 )
6. Start the VirtualHere client and the CloudHub will automatically appear listed after 15-30 sec
7. Use the USB device by right clicking the Device and selecting "Use".
Now you can wirelessly interact with the USB device just as if it was directly connected!
To manage the server right click on the CloudHub listed and select Properties: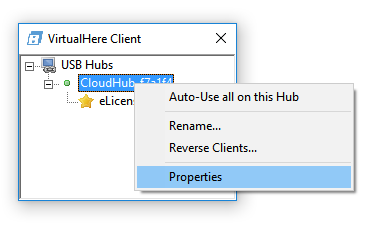
Select "Configure" then Enter the administrator password (cloudhub66) and a management screen will appear: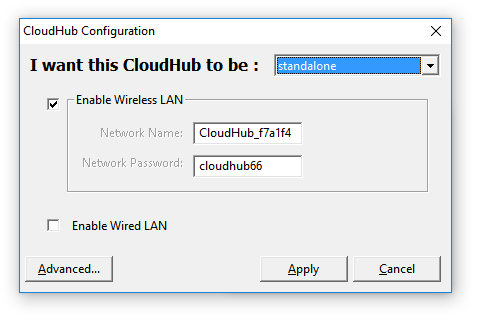
If you want to use the CloudHub as a standalone device, you can use this screen to change the password or wifi name. When using the CloudHub outdoors or on location you can set these values to create a local wifi network for users in the vicinity to access and control the attached USB device.
If you would like the router to join an existing network select "I want my CloudHub to be part of an existing network" and enter the network details 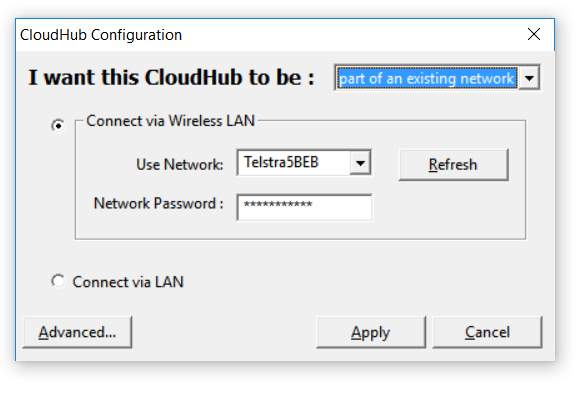
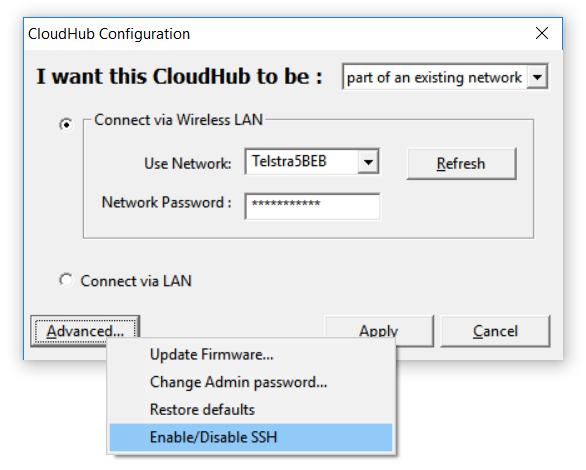
You can change the password and reflash updates to the firmware and other features by clicking on "Advanced".
Important: as a security measure, you should turn off SSH access via the "Enable/Disable SSH" button.
If you make a mistake and the router becomes unreachable (e.g you enter the wrong password, forget the password etc)
Raspberry Pi Devices GL-Inet Devices |